Nothing can dampen the thrill of finding a cool old cigarette lighter like a disintegrating or contaminated wick. While it can seem like a daunting task to the uninitiated, with a little bit of knowledge and a few common tools, just about anyone is capable of rewicking a petrol lighter.
Does My Lighter Need A New Wick?
There’s really only one reason you need to change the wick in a petrol lighter and that is it’s not lighting properly in one way or another.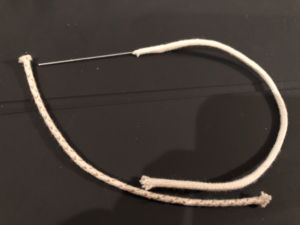
You might want to change it if you’re going to sell the lighter simply so it looks cleaner. Sort of like checking under the hood of an automobile you are interested in buying, you may not know everything but if it looks clean you will probably feel better about the purchase. Your customer is the same way.
Changing the wick in a petrol lighter is not a difficult task, neither is it expensive. But just so we are all aware, let’s cover a simple trick that can keep you from actually rewicking your lighter more times than not, just like a vape pen will suffice in the absence of a pipe.
Tug And Clip
Most petrol lighters employ a wick that is many times longer than is actually necessary for the function of the lighter. So, if the wick is getting a little short and burnt out looking follow these steps:
- With a pair of needle-nose pliers, grasp the top of the wick snugly and pull upward. Be careful not to pull out too much wick, as you are trying to avoid the entire job of rewicking with this procedure.
- Using a pair of scissors, snip off the old, burnt up part of the wick.
That’s it. With a full length wick you should be able to perform this task several times before needing to actually replace the wick but when the time comes that you do need to replace them, keep reading, I’ve got you covered for how to replace the wick in any petrol lighter.
Zippo, Insert Type Lighters
For the insert type lighters, there’s not much to it. You will start by removing the flint spring screw which will allow you to pull the felt pad from the bottom of the insert. Be careful to put your flint and spring screw in a safe place so you do not lose them.
Then, using a dental pick or other similar tool, begin to work the rayon or cotton wadding from inside the insert, up and out of it. Once all the wadding is removed, the old wick should be easily removed from the insert.
If the wick seemed contaminated with oil or another substance, it might be a good idea to bathe the insert in alcohol or lighter fluid before replacing the wick and repacking the insert. I don’t usually follow this step unless I feel pretty strongly the lighter was contaminated but this is not a difficult step to accomplish and there have been a few occasions where after replacing the wick and wadding, the lighter still wasn’t acting right and I wished I’d have just cleaned it thoroughly while I had the chance.
I always use the wicks with the copper wire woven through them when rewicking insert type lighters. Most times, with the insert clean and free of build-up or grime around the hole the wick is intended for, a stiff wick can be placed at the hole and with a gentle and constant pressured twist will install fairly easily.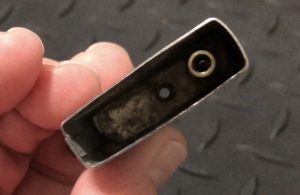
If the hole seems too tight, then use the wire in the wick to twist the wick tighter and longer and narrower. Once you’ve got it as skinny as you can on one end, then take a sharp pair of utility scissors and cut the frayed fibers off and shape that end of the wick into a “V”. This should provide enough relief to squeeze the wick into the hole. Occasionally, needle-nose pliers or another tool will be necessary to grasp a very small piece of wick and pull it through the hole. I’ve always found it easier to perform this task bottom up rather than top down.
Once the wick is in place, you can start replacing the wadding, layering the wick throughout as you pack it back into the insert followed by the felt pad. Replace your flint and spring screw, fuel up your lighter and you’re good to go.
Closed Tank, Blind Method
For most lighters with a closed tank, I use old Ronson wicks or the wire lead type wicks. I haven’t found any use for the actual wire lead part, as in my experience, when you meet resistance installing one, the wire lead separates from the wick every time.
Similarly, I’ve never been able to install a Ronson wick using the inserting tool included with those old wicks. I’m not even positive that these wicks are technically interchangeable but the method I have developed for installing them will work with both. Just make sure, once installed, the wick fits snug enough not to allow fuel to leak around the wick.
If you are using a wire lead wick, pull the wire out of it and set it aside, it’s not going to help you. Take one end of your wick and a good pair of scissors and make a long, angled cut that terminates at the end of the wick.
You will need wire or string of some kind. I use .3 mm beading wire, it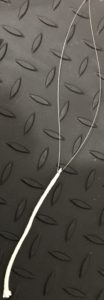 is stiff enough that you can fish it around and still recover it blindly through the awkward angle created trying to feed it down from the wick chimney. It is also pliable enough that you can bend it as needed with your bare hands and cut it simply enough with scissors.
Start with a piece of wire that is at least three times longer than your lighter is tall. You are going to double it over in half when you tie your knot and want to make sure you have enough to fish out of the tank to pull the wick into place. Just a single knot tied tightly just below the spot on your wick where the sloping cut begins. That is the key. Then each side of the wire bent straight down, away from the end of the wick.
I then wind the two ends of the wire together, so they are easier to
find when fishing them out through the bottom of the lighter. Insert the wire from the top. Once you get a hold on the bottom of the wire be careful, as you pull down, to seat the wick in place using a pick or other tool, if necessary. Work the pick on the wick from side to side from the top as you pull the wire slowly, alternating side to side as needed.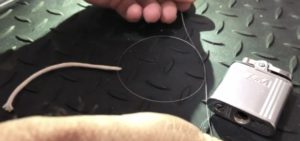
Sometimes the wick will need no coaxing at all, save the tug of the wire. Other times, some effort may be required to work the wick, bit by bit, into the chimney. Stuff the wadding back into the lighter after the wick is in place at the top, working the bottom of the wick in with the wadding as you go. Refuel and you are good once again.
We Would Love To Hear From You
Do you have any tips or tricks for rewicking, clearing flint tubes or otherwise working on our repairing old cigarette lighters? Leave us a comment at the bottom of the page. Your comment could be the inspiration for the next article.
You can email anytime with questions, comments, advice for fixing your own lighter or whatever else is on your mind.
You can join our email list to the right on any page at DependableFlame.com.
And please subscribe to the DependableFlame YouTube channel.
Hello, I have a McLaughlin’s Imperator made in the USA and I need instructions for proper method to open the case to re-wick the lighter. Thanks
Hello, Steve and thanks for the question. I’ve yet to have an Imperator in my hands, let alone the specific McLaughlin you referenced but from the photos and information I see online, I believe you could employ the “blind” method mentioned in this article. Basically, this requires removing the wadding from the body of the lighter, installing the new wick and replacing the wadding. Alternatively, you could mail it in and let me rewick it for you. You can also email questions at any time.
Hi! I’ve got an old benlow golmet lighter that could do with a new wick. Any idea how I would achieve this? I can see any obvious way to install/extend the wick. Many thanks 🙂
Where there’s a will, there’s a way! You may have to get creative but one of these methods or a combination or similar variation should work! Let me know how it goes or if you need further assistance.✌️
I picked up a Arrow lighter today not sure of the model. Gold slim and rather tall. It is not sparking. I will try to clean the flint tube. The wick is flush with the nipple it sits in. After fueling it it would not hold a flame due to wick to low. My question is this. Do I pull all the wedding out of the refuel hole? Will a Zippo wick work on this lighter?
Hello, Webb and thank you for the question. I have responded to you on our Facebook page but thought I’d go ahead and leave the email link so folks would know how to send their photos. Just snap a photo or two of the base of the lighter and the top of the lighter with the lid(if it has one) open.✌️
Hello I just bought a sort of zippo lighter , but it came with no wick inserted and no way of inserting a wick (downside doesn’t open) and there’s this small thin metal in the place of the wick with a little spring , this is a bit different than the lighters I know , but it doesn’t light it just sparks , what do I do?( oh there’s also a small hole thing under that can be switched somehow to +, – , I also don’t know how to do that)
I believe you are describing a butane lighter. Try to fill it with butane.✌️
I’ve just got hold of a Japan lighter/cigarette case combo petrol lighter. I’ve tried the blind method you describe but can’t get wick more than 1/4 inch into funnel. Have you ever worked on one of these lighters
Hello Neill. I am unsure of the exact brand in the pictures you emailed but I have rewicked many case/lighter combos and the blind method should work just fine. You may be getting hung up on something inside the tank but if it will go 1/4 inch in the chimney then you should be able to pull it out the other end with the wire. Make certain the wire is twisted up together so as not to hang on any protrusion inside the little tank.✌️
Hi! I’ve watched many of your videos and your website is also very informative. You’ve helped me a lot, thank you.
I’ve been working on some petrol lighters that have really small diameter wicks. I have ordered the IMCO wires, but I’m assuming those are larger, like for a Ronson standard? The models I have with small chimneys are all from Japan and the holes for the wicks look to be only about 1.5 – 2mm wide.
Thank you!
The Imco and Ronson wicks seem to me about the same size and relatively interchangeable. I have rewicked several Japanese lighters and haven’t encountered one that wouldn’t accept an Imco wick. Do you have photos?
What type of cotton should be used in a Ronson Standard? The original is about 80 years old so it’s due for a change!
Hello David. Really any kind of absorbent material will work. I use the organic cotton coil linked to here.
hello, Im wondering if i need to burn the wick, before putting fuel in the lighter, I feel like i had heard that it helped the flame in some way…Is this true or should i put fuel in and light it right away?
I’ve never heard that Dom. I’ve never done it either.✌️
Hi! So I have a circle vintage kerosene trench lighter. Found on Amazon. And I don’t know how to replace the wick? Thanks!
I don’t know the exact lighter you are talking about but most every petrol lighter follows the same principles: take the old wadding and wick out the bottom, new wick goes down the chimney and new wadding gets packed in from the bottom. This video should help.
Hi! I recently acquired a vintage hyglo table lighter. The squat little sterling & glass number that has a cap & indented star on the bottom. It needs a wick and fluid but the center piece that houses the flint & wick doesn’t want to budge. (I haven’t tried very hard yet as I don’t want to damage it & haven’t had the time to sit down at the workbench to look at it. Can you give me any ideas?
Thanks!
WD-40 or other lubricant should help but will foul up your wick and wadding so be ready to replace them.✌️
Hey I have a Casablanca brass lighter that I cannot figure out how to replace the wadding
You will pull it out the fuel hole, then pack it back in the same way after replacing the wick.✌️
HI, i got an old Sarome bluebird from my grandparent, the thing is that it doesnt have a wick at all!. It hasnt been used in at least 30 years. Could you please tell me how to replace it?
Thanks a lot!!
Hey Matias, thanks for the question. Rewicking the Sarome Bluebird would be just about like any other closed tank lighter but maybe a little easier because it is not that deep. Remove all the wadding, then feed the wick down the chimney and replace wadding. This video of a similar lighter should help. The wick will go down the chimney, the wadding in through the fuel hole. I hope this helps and please let me know if you need further assistance.
Hey joe I got a Ronson Master case was wondering how to replace the wick on it since there’s no access to the wadding compartment, only through the fill hole any way you know how to change the wick out
Hey Sean, thanks for the excellent question. I don’t have a Mastercase to demonstrate on but I do have a Lytacase that I could use as the principles will not change. I will publish an article on the subject Monday but the situation you describe is no different from any closed tank lighter, the fuel hole is always the only access to the wadding chamber even if the position of that fuel hole may be in a different position or angle. Check out the article Monday, I will include a link here when it goes up.